In this article
Custom fields are essential tools for better managing and segmenting your contacts based on the specific information you want to collect. Below is a more detailed explanation of what these fields are for, along with practical examples to help you use them effectively.
Before you begin
What are custom fields used for?
Custom fields allow you to add additional information about your contacts. In addition to standard fields like email or name, you can create custom fields to collect any type of data relevant to your business or mailings.
Here are some practical examples to better understand how to use custom fields:
-
Segment your contacts: You can use custom fields to segment your contacts based on the information you’ve collected.
For example:
Industry: Create groups based on your contacts’ industries to send targeted offers that match their specific needs.
Product preferences: If you have a field to capture your contacts’ product or service preferences, you can send personalized emails highlighting the items they’re most likely to be interested in. - Personalize your email content: Custom fields allow you to add unique content for each recipient. For example, you can insert specific details such as their purchase date or the product they bought to make your messages more engaging and relevant.
-
Quickly find the right contacts with advanced search
Advanced search lets you filter your contacts based on the values of their custom fields. For example, you can find all contacts whose “Main interest” field contains a specific value, or those who have VIP status, and then perform targeted actions like adding them to a group or sending them a personalized email.
Learn more about advanced search > -
Use dynamic groups
Automatically create groups based on the values of your custom fields. For example, a dynamic group could include all contacts whose “Status” field is equal to “Active customer.”
Learn more about dynamic groups > -
Display conditional content with dynamic blocks
Show a different block in your emails based on the value of a custom field. For example, a contact whose “Membership type” field is equal to “Premium” could see a block with exclusive benefits, while a standard member would see a different message.
Learn more about dynamic blocks > -
Trigger actions in marketing automation
Use custom fields as triggers or conditions in your scenarios. For example, you can start a sequence when the “Renewal date” field is approaching.
Learn more > -
Automatically segment based on a custom field
Create an automated scenario that starts when a contact has a specific value in a custom field. For example, you can send a personalized welcome email to contacts whose “Customer type” field is equal to “New subscriber.” This scenario is triggered automatically as soon as a new contact meets the condition.
Learn more about segmentation scenarios >
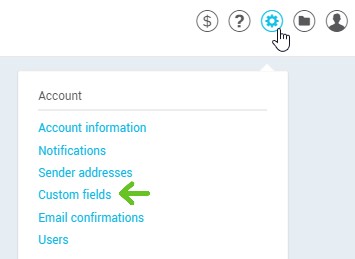
- To create a new custom field, go to .
- To add a custom field, click the + on the right-hand side of a custom field. If there aren’t any, go directly to the next step.
-
Select the type of field matching the type of information you’d like to collect.
Learn more about Text fields >
Learn more about Date fields >
Learn more about Integer fields >
Learn more about Decimal number fields > -
Name your field (e.g. Job title). It must differ from any regular field names
- Click Save to confirm the addition.