In this article:
How to setup your account and contact information
In this section, learn how to:
- Setup your account information
- Setup your contact information (in your email footer)
- Setup your sender addresses
- Setup your payment information
Setup your account information
- Click the gear icon at the top-right of your screen and select Account information.
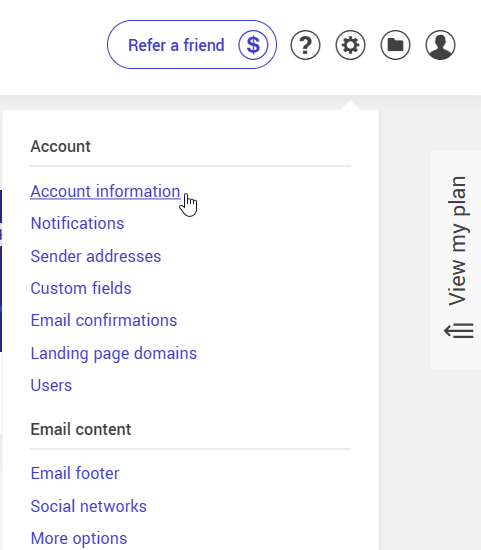
- Make the necessary changes in the correct fields.
.png)
- Don’t forget to save your changes at the bottom of the page!
Main contact information
Enter the contact details of the main contact for your account. This information is only visible to users in your account and is helpful to our team. Your contacts will never see this information.
Language
Select the language in which you'd prefer to receive our communications.
Time Zone
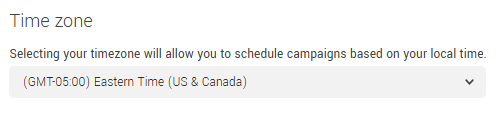
Select your local Time zone in the drop down list to schedule your mailings at the preferred moment.
Business details (Optional)
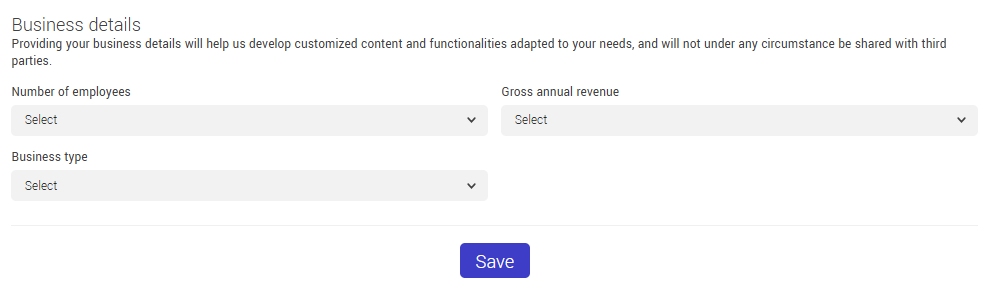
These informations are not mandatory. These data only help us to provide features and content adapted to your needs and will never be divulged to third-parties.
Setup your contact information (in your email footer)
To setup your contact information:
At the top of the Account Information page, click Email footer. You can also access this section by clicking

.png)
- The contact details entered in that section will appear in the footer of your emails and will be used to properly identify your company.
- These informations are necessary to be CASL compliant. CASL came into force on July 1st 2014.
- The name written down in the "Company" field will, by default, be used as the Sender in the inbox of your contacts. The email in the "Email" field will be used as the default return address. Both of these informations can be changed when scheduling your email, as needed.
-
Once configured, the footer contact information should not be changed frequently. Here's why:
-
The footer is updated at the time the campaign is sent, not when you make changes to your settings. If you update your footer details while campaigns are already scheduled, those campaigns may go out with different contact information than intended.
-
The platform is designed for one organization per account. The footer should reflect your main organization (head office). If you have multiple branches, enter the head office address in the footer. This is the address used to comply with Canada's Anti-Spam Legislation (CASL). Branch-specific addresses can always be added directly in the body of your mailing.
-
Your company name and address appear in several system-generated pages and emails, such as subscription and unsubscription confirmations. Since it's impossible to predict when subscribers will take these actions, this information must remain consistent over time.
-
Multilingual option: If you'd like to display a different address depending on the language of the campaign (for example, a Montréal address for French campaigns and a Toronto address for English campaigns), you can use the Configure a different address for each language option.
If you manage multiple separate organizations with no connection between them, each should have its own account. This keeps your statistics separate for each organization and eliminates the risk of accidentally mixing up campaign templates or contact lists. A multi-account login can be set up so you can access all your accounts with a single set of credentials. Contact our customer service team if this applies to you.
.png)
I’m Self-employed…should I write down a postal address?
Yes. CASL requires a postal address as part of a proper identification. You can, however, use a postal box if you possess one and want to avoid writing your home address in the footer of your emails.
Setup your sender addresses
To set up your sender addresses, go to .
Learn more about sender addresses >
Setup your payment information
To set up your payment information or change your billing contact's information, go to .
Subscribe to system notifications
You can subscribe to receive these types of notifications:

Allow us to send you valuable and important information about your account by email by configuring your notifications. These email addresses will never be visible to people receiving your email.
To do so:
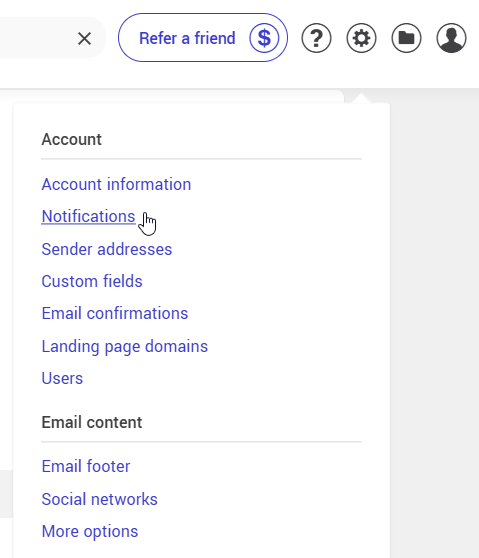
- Click the gear icon at the top-right of your screen and select Notifications.
.png)
- Enter the appropriate email address in the desired fields.
- Click Save.
Email address to receive a notification when there is a new subscription
Email address to receive the monthly Consent expiration report
- Total of contacts in your account;
- Total of express consents;
- Total of implied consents;
- Total of contacts without a consent expiration date;
- Expired implied consents;
- Implied consents expiring during the upcoming month.
You therefore need to take full advantage of the period of time the consent is still valid to obtain an express consent from your customer. A few tools, such as our consent blocks and marketing automation consent campaign scenarios, are offered to help you achieve this goal.
Note that there is no action done by the system to clean your list of expired consents. Each of our customers is at discretion of taking the appropriate actions to manage the consent expiration properly.
Also, it's important to know that the system can only calculate the expiry date for implied consents if you have defined a consent date and source in your contact profile. To learn how to update your contact's consent and learn more about the sources of consent available in the app:
See the following article >
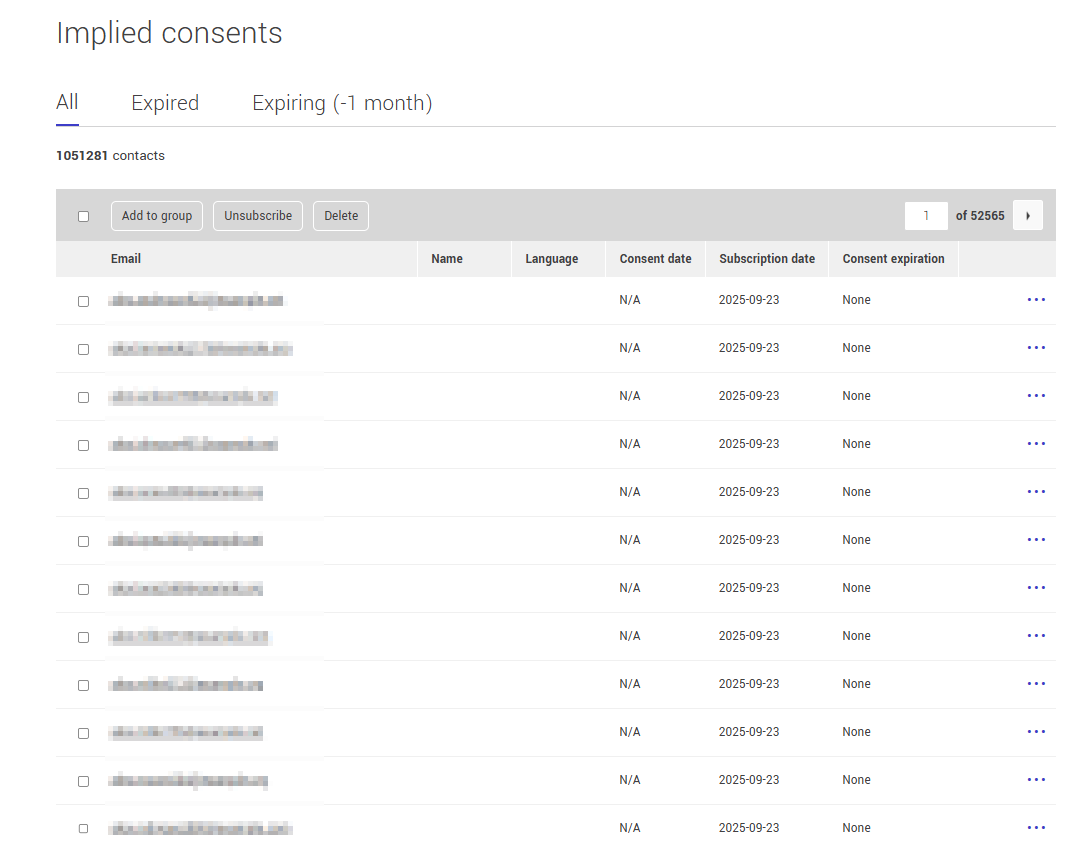
The list of contacts with expired or soon-to-expire implied consents is available at any time from your global statistics. Under the Contacts tab, locate the section Implied Consents and click on the number displayed. You will then be taken to a page with three tabs: All, Expired and Expiring (-1 month). Select the desired tab to view the list of contacts in that category. From this list, you can perform certain actions on selected contacts, such as adding them to a group, unsubscribing them, or deleting them.
To stop receiving the monthly consent expiration report:
It’s not mandatory to receive this report. You can subscribe to it or remove your address at any given time.
- Click the gear icon at the top-right of your screen and select Notifications.
- Remove the email address found in the field under the Receive monthly consent expiration report.
- Click the Save button on the bottom of the page to save your changes.
How to add, edit or delete custom fields
.png)
There are fields already assigned to specific informations in your contact details:
- First name
- Last name;
- Company;
- Language;
- Gender;
- Postal Code;
- Country;
- Birthdate;
- Consent information (source, date and proof of consent).
Along with these default fields, you can add 5 to 30 custom fields to enter information relevant to your customers or company. Label these fields to remember the use type of information you wish to collect (e.g.: the "Custom field 1" could be for the client number your contact is related to, the "Custom field 2" could be used for their phone number…).
The content of these fields could be used to personalize your mailings and segment your contacts. You can also add these fields in your subscription forms to collect more information about your subscribers.
Learn more about custom fields >
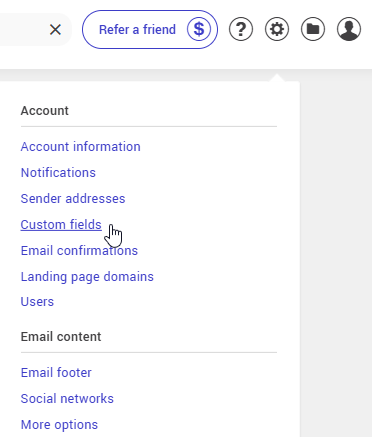
To access the custom fields section:
- Click the gear icon at the top-right of your screen and select Custom fields.
Enter default links for your social networks icons
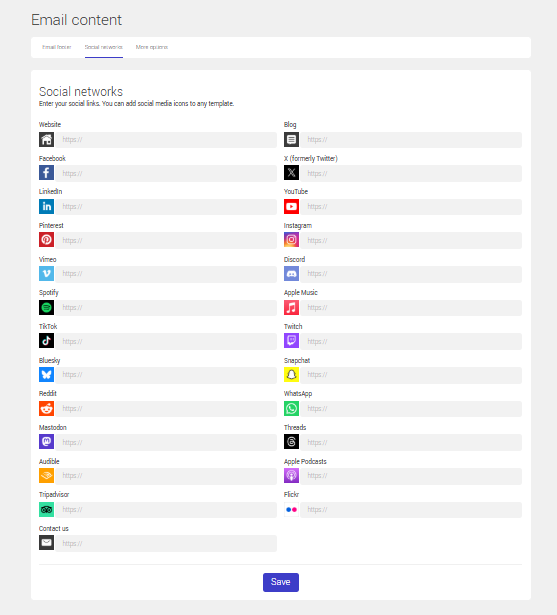
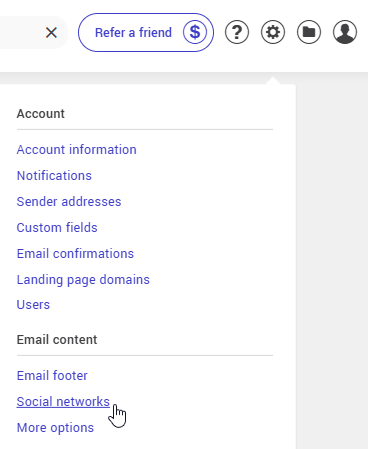
- Click the gear icon at the top-right of your screen and select Social networks.
- Paste the URL to your social media profile in the appropriate field.
To find out how to find your social network profile URL >
- Click the Save button on the bottom of the page to save your changes.
Entering your social networks in your settings will save you time while editing your templates if you use the Social media block. The URL for the fields in the bar will already be populated with the information you entered in your settings. All that will be left for you to do will be to select the icons you wish to show and the icon style you favor.
Learn more >
Note: while editing your template, it is possible to change the link to your social media profiles. However, this action will not be duplicated in your settings!
Setup other display options
Learn how to:
- Add your logo
- Change the colour of your subscription email button
- Remove our logo from your email footer
Add your logo
- Click the gear icon at the top-right of your screen and select More options.
.png)
- Click Choose to add your logo (see below for explanations about the available options).
.png)
- Click the Save button at the bottom of the page to save the changes.
About the logo
Add your company logo to display on default pages generated by the application and automated emails for subscriptions, unsubscription and consent confirmation.
Note: you can’t edit the size of your logo. Make sure your logo has the right proportions before uploading it. We suggest a width of 200 px or more to ensure a good image quality (If bigger, your logo will be resized to this width). Supported formats are as followed: gif, png and jpg.
Change the colour of your subscription email button
- Click the gear icon at the top-right of your screen and select More options.
(1).png)
- Open the buttons' color picker dropdown to change the colour. You can either enter an hexadecimal code or click in the color picker to choose a colour.
- Don't forget to save your changes.
Remove our logo from your email footer
This option is only available for Pro plan.
To remove our logo from your email footer:
- Go to .
- Turn off the switch to hide our logo.
- Don't forget to save the changes.
After you activate the switch, wait a few minutes before sending an email. This will make sure the logo will be removed from the footer of your next communication.